PH8124
Lecture 3: Linux file system. Positional parameters. Your first Linux/Bash command. Command precedence
Last update: 20260501-5

Table of Contents
- Linux file system
- Positional parameters
- Your first Linux/Bash commands: Bash functions
- Command precedence
1. Linux file system
We have already seen how you can make your own files (e.g. with touch, cat or nano), and your own directories (with mkdir). The organization of files and directories in Linux is not arbitrary, and it follows the common and widely accepted structure named Filesystem Hierarchy Standard (FHS). The top directory is the so-called root directory and is denoted by / (slash). You can enter it and see its content by executing the following code snippet in the terminal:
cd /
ls
The output could look like:
bin boot dev etc home lib media opt proc root run sbin sys tmp usr var
All files and directories on your computer are in one of these subdirectories. Depending on which Linux distribution you are using, the details might differ — you can programmatically inspect which Linux distribution is installed on your computer with the following command:
$ cat /etc/os-release
NAME="Ubuntu"
VERSION="20.04.4 LTS (Focal Fossa)"
ID=ubuntu
ID_LIKE=debian
PRETTY_NAME="Ubuntu 20.04.4 LTS"
VERSION_ID="20.04"
HOME_URL="https://www.ubuntu.com/"
SUPPORT_URL="https://help.ubuntu.com/"
BUG_REPORT_URL="https://bugs.launchpad.net/ubuntu/"
PRIVACY_POLICY_URL="https://www.ubuntu.com/legal/terms-and-policies/privacy-policy"
VERSION_CODENAME=focal
UBUNTU_CODENAME=focal
Schematically, the Linux file system structure can be represented with the following diagram:
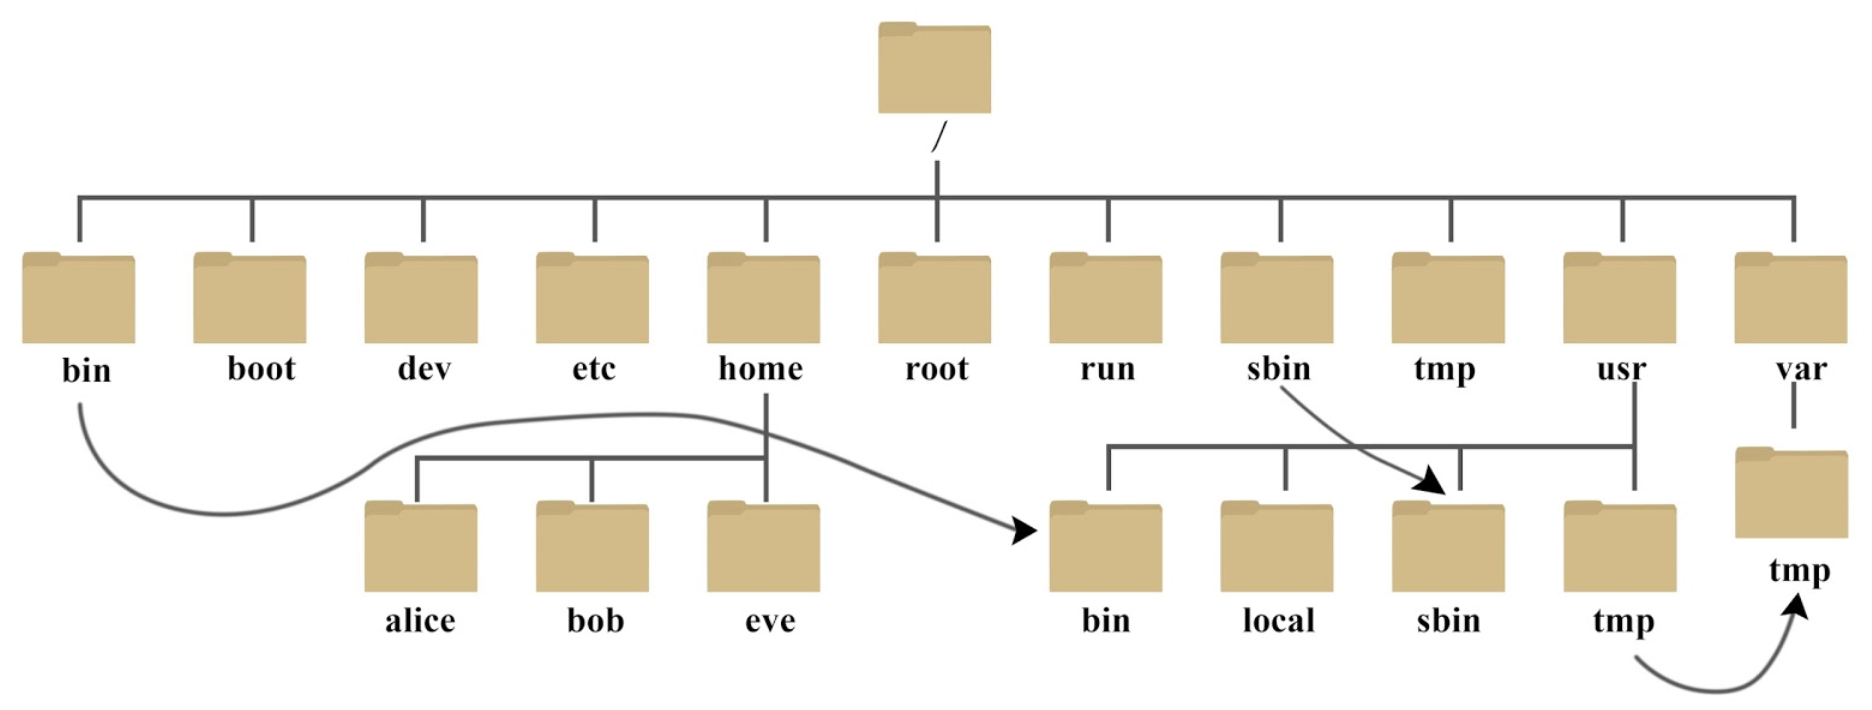
The Bash built-in command cd (‘change directory’) is used to move from the current working directory to some other directory. It accepts only one argument, which is interpreted either as an absolute path to the new directory (if the argument starts with /), or as a relative path to the new directory (relative to your current working directory). If you use cd without any argument, the argument is defaulted to the home directory. Due to their special meanings, the only characters that cannot be part of a directory name are / and the null byte \0.
If you get confused where you are at the moment in the Linux file system (i.e. where is your current working directory in the overall file system hierarchy), you can always get that information either from Bash built-in command pwd (‘print working directory’):
pwd
or by referencing the content of environment variable PWD, which is always set to the absolute path of your current working directory:
echo $PWD
Both versions return the same answer in all cases of practical interest. However, and as a general rule of thumb, it is always much more efficient to get information directly from the environment variable like PWD, than to retrieve and store in a variable the same information by executing the command, via the so-called command substitution operator $( ... ) (more on this later).
The most important directories in the Linux file system structure are:
/bin: essential binaries needed for system functioning at any run level/usr/bin: binaries used by all locally logged in users/usr/sbin: binaries used only with superuser (root) privileges/dev: location of special or device files/etc: system-wide configuration files/home: holds user-specific accounts, personal area for each user/proc: kernel and process information/tmp: temporary files
We have already used Linux commands date and touch. But to which physical executables (binaries), stored somewhere in the file system, these two commands correspond to? For all cases of practical interest, you can figure that out simply by using the command which:
$ which date
/bin/date
$ which touch
/usr/bin/touch
It is completely equivalent to execute in the terminal the command name, e.g. date, or the full absolute path to the corresponding executable. Therefore,
$ date
Mon Apr 27 16:12:06 CEST 2020
is the same as:
$ /bin/date
Mon Apr 27 16:12:06 CEST 2020
It would be very tedious and impractical if each time we would like to use some command, it would be necessary to type in the terminal the absolute path to its executable sitting somewhere in the Linux file system, both in terms of typing and in terms of memorizing the exact locations. This is precisely where Bash (or any other shell) is extremely helpful — shell finds the correct executable in the file system for us, after we have typed only the short command name in the terminal, and executes it. Clearly, something is happening here behind the scene: How does shell know which physical executable in the file system is linked with the short command name you have typed in the terminal? Hypothetically, we could also have another version of date command sitting somewhere else in the file system, e.g. in the directory /usr/bin/date. Then there is an ambiguity, since after we have typed in the terminal date, it is not clear whether we want /bin/date or /usr/bin/date to be executed.
This is resolved with a very important environment variable PATH. To see its current content, simply type:
echo $PATH
The output could look like this:
/home/abilandz/bin:/usr/local/sbin:/usr/local/bin:/usr/sbin:/usr/bin:/sbin:/bin
This output looks messy, but in fact it has a well-defined structure which is easy to decipher. In the above output, we can recognize absolute paths to a few directories, which are separated in this context with the field separator : (colon). The directories specified in the environment variable PATH are extremely important, because only inside them Bash will be searching for a corresponding executable, after you have typed the short command name in the terminal. Literally, the command date works because the directory /bin, where its corresponding executable /bin/date sits, was added to the content of PATH variable. The order of directories in PATH variable matters — when Bash finds your executable in some directory specified in PATH, it will stop searching in the other directories specified in PATH. The priority of the search is from left to right. Therefore, if you have two executables in the file system for the same command name, e.g. /bin/date and /usr/bin/date, and if the content of PATH is as in the example above, after you have typed in the terminal date, Bash would try first to execute /usr/bin/date and not /bin/date, because /usr/bin is specified before /bin in the PATH variable. However, since there is no date executable in /usr/bin, Bash continues the search for it in /bin, finally finds it there, and then executes /bin/date .
By manipulating the ordering of directories in PATH variable, you can also have your own version of any Linux command — just place the directory with your own executables at the beginning of PATH variable, and then those directories will be searched first by Bash. For instance, you can have your own executable for date in your local directory for binaries (e.g. in /home/abilandz/bin). Then, you need to redefine PATH in such a way that it has your personal directory with higher priority, when compared to standard system-wide directories for command executables (like /bin, /usr/bin, etc.). This is achieved with the following standard code snippet:
PATH="/home/abilandz/bin:${PATH}"
With this syntax, directory with your personal executables /home/abilandz/bin is prepended to the current content of PATH, and therefore your executables will have a higher priority in the Bash search.
For the lower priority of your executables, use an alternative standard code snippet:
PATH="${PATH}:/home/abilandz/bin"
In this example, you have appended the directory with your executables to what is already set in PATH — this way you indicate that you want to use your own version of some standard system-wide Linux command only if its executable is not found by Bash. As always, if you want to make such definitions permanent in any new terminal you open, add the above redefinitions of PATH into ~/.bashrc file. In case you want the redefinition of PATH to be persistent in all new processes you start from a terminal, use in addition the command export at the first redefinition of PATH variable.
From the above explanation, it is clear that if you unset PATH variable, all commands will stop working when you type them in the terminal, because Bash does not know where to search for the corresponding executables.
We finalize the explanation of PATH variable with the following concluding remarks:
-
The search for the corresponding executable, after you have typed the short command name in the terminal, is optimized in the following ways:
-
Not all the files in the specified directories in PATH are considered during the search — only the files which have execute permission (
x) are taken into account (more on this in a moment!); -
The recently used commands are hashed in the table — this table is then looked up first by Bash after you type the command name in the terminal. To see the current content of the hash table, just type Bash built-in command hash in the terminal:
hashThe output could look like:
hits    command
   4    /usr/bin/which
   5    /usr/bin/git
   1    /bin/date
   2    /bin/cat
   6    /bin/ls
Clearly, the hash mechanism adds a lot to the efficiency of commands’ usage in Linux. Each time you login for the first time on computer the hash table is empty. Each terminal session keeps its own hash table.
-
-
The PATH search can be skipped by the user. In particular, when the command name contains the
/(slash) character, not necessarily at the beginning of the name, Bash will not perform the search for the corresponding executable — underlying assumption is that you have now yourself specified the path in the file system, either absolute or relative, to the corresponding executable. In this case, Bash tries to execute that command name on the spot. This explains the standard syntax to run the command whose executable is in your current directory:./someCommandIn this context, the dot
.is a shortcut syntax for the absolute path to the current working directory (the analogous shorthand notation for the parent directory is..). With the above syntax, even if the command someCommand with a different implementation exists in some directory stored in PATH, it will never be searched for and executed, because there is/in the above command input.
Some frequently used Linux commands to work within the file system are:
-
cp : copy file(s)
  cp file1 file2 # copying and renaming a file
  cp file1 file2 ... someDirectory # copying two or more files into someDirectory
                                   # the names of original files are preserved
Files and directories in the arguments of cp can be specified either with the absolute or the relative paths. This is true in general for all commands which take files and directories as arguments.
-
cp -r : copy directory and preserve its subdirectory structure
cp -r directory1 directory2 # this will copy the first directory into # a new subdirectory of the second directory -
rm : delete file(s)
rm file1 file2 ... # delete the specifed filesUse rm with great care, because after you deleted the file, there is no easy way back!
-
rm -rf : delete one or more directories
rm -rf dir1 dir2 ... # delete the specified directoriesFlag -r (‘recursive’) is needed to indicate that you want to delete all subdirectories recursively, -f (‘force’) is needed to avoid the prompt message which would ask you for the deleting confirmation of each file separately. Use rm -rf with the greatest possible care, because after you have deleted the directory, there is no easy way to get back any of the files that was in that directory!
-
mv : move or rename files or directories
  mv someFile someDir/   # moving a file into new directory
  mv file1 someDir/file2 # content of 'file1' overwrites 'file2', and 'file1' is deleted
  mv file1 file2         # effectively renaming: 'file2' becomes 'file1'
                         # (they are in the same directory!)
The command mv uses the same syntax for directories (no additional flags are needed).
mv dir1 dir2 # if 'dir2' exists, 'dir1' becomes the subdirectory of 'dir2' # if 'dir2' doesn't exist, 'dir1' is renamed into 'dir2' mv dir1 dir2 ... dirN # if 'dirN' exists, 'dir1', 'dir2', ..., become subdirectories of 'dirN' # if 'dirN' doesn't exist, syntax error -
du -sh (‘disk usage’) : Estimate the disk space used by files and directories. For directories, the flag -s prints the summary size for all nested subdirectories. The flag -h prints the size in a human-readable format.
$ du -sh ${HOME} # prints how much disk space your home directory is taking 967M $ du -h --max-depth=1 ${HOME} # the size of directory, and differentially # of its subdirectories $ du -h --max-depth=2 ${HOME} # the size of directory, differentially of its # subdirectories and all sub-subdirectories $ du -h file1.txt file2.txt # prints size of two specified files 20K file1.txt 192K file2.txt -
df -h (‘disk free’) : get the used disk space of all disks in a human-readable format (the flag -h).
$ df -h # get the status of all disks file system Size Used Avail Use% Mounted on /dev/sda1 1.8T 1.6T 132G 93% / -
stat : display the detailed metadata of file or directory.
  $ stat Lecture_2.md # just specify the abs. or rel. path to file as an argument
    File: Lecture_2.md
    Size: 97805           Blocks: 384        IO Block: 4096   regular file
  Device: 2h/2d   Inode: 12947848928707821  Links: 1
  Access: (0666/-rw-rw-rw-)  Uid: ( 1000/abilandz)   Gid: ( 1000/abilandz)
  Access: 2020-04-15 21:05:26.002857000 +0200
  Modify: 2020-04-28 11:44:53.454187100 +0200
  Change: 2020-04-28 11:45:14.515681300 +0200
   Birth: -
Later we will learn how to parse through and extract programmatically from any command output (or from any physical file) only the information we need. Specifically for the stat command, if you want to get only the size of the file in bytes, use directly:
  $ stat -c %s Lecture_2.md
  97805
For the size of a directory, use instead du -sh as explained above.
As you can see from the above output of stat, the example file Lecture_2.md is characterized by three timestamps: Access, Modify and Change. These three timestamps are an important part of file metadata, which we cover next.
File metadata
File metadata is any file-related information besides its content. From the user’s perspective, the most important file metadata are timestamps, ownership and permissions.
The meaning of three timestamps is as follows:
- Access (atime) : last time a file was accessed (opened) and read without any modification
- Modify (mtime) : last time a file was modified (i.e. its content has been edited)
- Change (ctime) : last time a file’s metadata was changed (e.g. permissions)
These three timestamps are not an overkill, in fact, they enable a lot of very powerful features when searching for specific files or directories in the file system. For instance, by using them, it is possible to list names of all files modified within the last day, to delete all files which were not accessed for more than 1 year, etc.
Next, each file or directory in Linux has three distinct levels of ownership:
- User (u) : the person who created the file
- Group (g) : the wider group to which the person who created the file belongs to
- Other (o) : anybody else
File ownership becomes extremely handy in combination with file permissions, when it is very simple to set common access rights for any group of other users.
Finally, each file in Linux has three distinct levels of permissions (or access rights):
- Read (r) : file can be read
- Write (w) : file can be written to (i.e. edited)
- Execute (x) : file is executable (i.e. binary, program)
For instance, when you execute
ls -al someFile
you can get the following example output:
-rw-rw-rw- 1 abilandz alice 97805 Apr 28 12:23 someFile
It is very important to understand all entries in this output, and how to modify or set some of them. Reading from left to right:
- Column #1:
- the very first character is the file type:
-is an ordinary file,dis a directory,lis a soft link, etc. - characters 2, 3 and 4 are fields for
r,worxpermissions for the user (i.e. for you) - characters 5, 6 and 7 are fields for
r,worxpermissions for the group (i.e. wider group of people where your account belongs to) - characters 8, 9 and 10 are fields for
r,worxpermissions for anybody else
- the very first character is the file type:
- Column #2: For a file, it is always 1. For a directory, it is the number of immediate subdirectories in it, plus its parent directory and itself. Therefore, for directories, this number is always greater than or equal to 2. It is equal to 2 for an empty directory, and for a directory that contains only files (i.e. there are no subdirectories). It is greater than 2 for a directory if there is at least one subdirectory in that directory.
- Column #3: The user who owns the file (‘abilandz’ in this case).
- Column #4: The group of users to which the file belongs (ALICE experiment at CERN in this case).
- Column #5: The size of the file in bytes (for directories, it has another meaning, it is NOT the size of the directory!).
The meaning of the remaining columns is trivial.
File permissions are changed with the Linux command chmod (‘change mode’). This is best illustrated with a few concrete examples:
chmod o+r someFile.txt
After the above command was executed, others (o) can (+) read (r) your file someFile.txt. Whatever was set for w and x flags for others, it remains intact. A slightly different notation:
chmod o=r someFile.txt
would ensure that for others, only r is set, while w and x flags are forced to -. In this example:
chmod go-w someFile.txt
group members to which your account belongs to (g) and all others (o) can not (-) modify or write (w) to your file someFile.txt. Therefore, after this simple command execution, only you can edit this file!
With this syntax:
chmod u+x someFile.txt
the file someFile.txt is declared to be an executable and only you as a user (u) can (+) execute (x) it.
Remember that only the files which are executables are taken into account by Bash when searching through the content of directories in PATH variable. Therefore, when making your own Linux command, two formal aspects must be always met:
- the directory containing your executable must be included in the content of PATH variable;
- your executable must have
xpermission.
Next example:
chmod ugo+rwx someFile.txt
Now everybody (you as a user (u), group members (g) and others (o)), can read (r), modify or write (w) to, or execute your file (x). For directories, you can change permissions in one go for all files in all subdirectories, by specifying the flag -R (‘recursive’), i.e. by using schematically:
chmod -R some-options-to-change-permissions someDirectory
Note that it makes a perfect sense to use x permission also for directories, because we can then add recursively in one go x permission to all files in that directory.
Finally, we clarify that the setting for each permission can be represented alternatively by a numerical value. The rule is established with the following simple table:
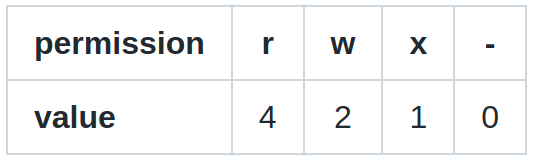
When these values are added together, the sum is used to set specific permissions.
For example, if you want to set only ‘read’ and ‘write’ permissions, you need to use a value 6, because from the above table, it follows immediately: 4 (‘read’) + 2 (‘write’) = 6. If you want to remove all of ‘read’, ‘write’ and ‘execute’ permissions, you need to specify 0.
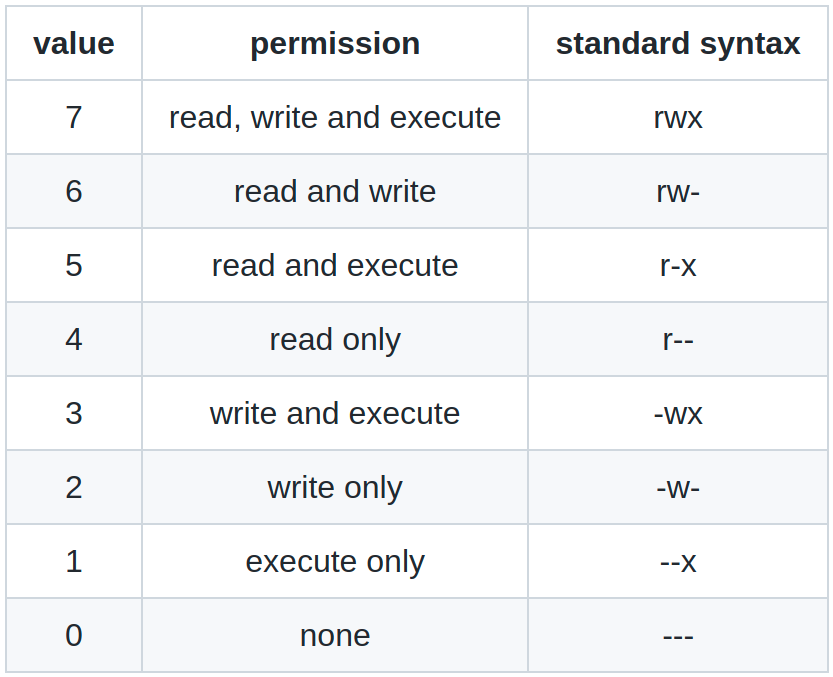
For convenience, all possibilities are documented in the table:
Example: Make a new file with default permissions, then remove all permissions, and set the permission pattern to -rwx--xr-- , by using both syntaxes described above. With the first syntax, we would have:
touch file.log # make a new file
# the default permission pattern is: -rw-rw-rw-
chmod ugo-rwx file.log # strip off all permissions
# pattern is now: ----------
chmod u+rwx,g+x,o+r file.log # set new requested permissions
# the final pattern is: -rwx--xr--
With the alternative syntax, we proceed as follows:
touch file.log # make a new file
# the default permission pattern is: -rw-rw-rw-
chmod 000 file.log # strip off all permissions
# pattern is now: ----------
chmod 714 file.log
# the final pattern is: -rwx--xr--
It practice, it is not needed to remove old permissions and only then to set the new ones — it was done here that way only for the sake of this exercise, but the old permissions can be directly overwritten.
Example: Does command cp copy also the permissions of original file into a new file?
# make a new file with default permissions:
$ touch file1.txt

# check the permisions:
$ ls -la file1.txt
-rw-rw-r-- 1 abilandz abilandz 0 Mai 14 14:19 file1.txt

# change the permisions:
$ chmod o+w file1.txt

# copy the original file into new file:
$ cp file1.txt file2.txt

# check the permissions of both files:
$ ls -al file*
-rw-rw-rw- 1 abilandz abilandz 0 Mai 14 14:19 file1.txt
-rw-rw-r-- 1 abilandz abilandz 0 Mai 14 14:22 file2.txt

# copy the original file into new file using option '-a':
$ cp -a file1.txt file3.txt

# check the permissions of all files:
$ ls -al file*
-rw-rw-rw- 1 abilandz abilandz 0 Mai 14 14:19 file1.txt
-rw-rw-r-- 1 abilandz abilandz 0 Mai 14 14:22 file2.txt
-rw-rw-rw- 1 abilandz abilandz 0 Mai 14 14:19 file3.txt
As we can see above, the new file file2.txt was created with default permissions if cp was used without any options. Permissions were correctly copied over into the new file file3.txt only if cp -a was used (in this context, the flag -a means ‘preserve all’). The same thing happens when on a shared computer we copy a file from the home directory of another user into our home directory. As a side remark, we mention that the default permissions for files and directories can be modified with shell’s built-in command umask.
Before we start developing the new commands from scratch in Linux, we need to introduce one very important and fairly generic concept: positional parameters (or script arguments).
2. Positional parameters
In this section we discuss how some arguments can be supplied to your script at execution. This clearly will allow you much more freedom and power in the code development, because nothing needs to be hardcoded in the script’s body. The very same mechanism can be used also in the implementation of Bash functions, as we will see later. We introduce now the so-called positional parameters (or script arguments).
Example: We want to develop a script named favorite.sh which takes two arguments: the first one is the name of the collider, the second the name of the experiment. This script then just prints something like:
My favorite collider is <some-collider>
My favorite experiment at <some-collider> is <some-experiment>
The solution goes as follows — edit the file favorite.sh with the following content:
#!/bin/bash

echo "My favorite collider is ${1}"
echo "My favorite experiment at ${1} is ${2}"

return 0
If you now execute this script as:
source favorite.sh LHC ALICE
the printout looks as follows:
My favorite collider is LHC
My favorite experiment at LHC is ALICE
So how does this work? It is very simple and straightforward, there is no black magic happening here! Whatever you have typed first after source favorite.sh , and before the next empty character is encountered in the command input, was declared as the 1st positional parameter (or the 1st script argument). The value of the 1st positional parameter is stored in the internal variable ${1} (‘LHC’ in the above example). Whatever you have typed next, and before the next empty character is encountered, is declared as the 2nd positional parameter, and its value is stored in the internal variable ${2} (‘ALICE’ in the above example). And so on — in this way you can pass to your script as many arguments as you wish!
Once you fetch programmatically in the body of your script the supplied arguments via variables ${1}, ${2}, etc., you can do all sorts of manipulations on them, which can completely modify the behavior of your script.
Few additional remarks on positional parameters:
-
You can programmatically fetch their total number via the special variable:
$# -
You can programmatically fetch them all in one go via the variables:
$*or$@. In most cases of interest, these two variables are the same. For the purists:"$*"is equal to"$1 $2 $3 ...", while"$@"is equal to"$1" "$2" "$3" .... This means that"$*"is a single string, while"$@"is not, and this will cause a different behavior when you loop over all entries in"$*"or"$@". But if you drop the double quotes, there is no difference between the content of special variables$*and$@. -
It is also possible to access directly the very last positional parameter, by using the indirect reference (‘value of the value’) operator
!— the syntax for the last positional parameter is${!#}. As a side remark, indirect reference!is a ‘sort of pointer’ in Bash, and its general usage is illustrated with the following code snippet:Alice=44 Bob=Alice echo ${Bob} # prints Alice echo ${!Bob} # prints 44
In combination with looping, you can programmatically parse over all supplied arguments to your script (i.e. there is no need to hardwire in the script that you expect exactly a certain number of arguments, etc.).
Example: Below is the script arguments.sh, which uses the for loop in Bash (loops are covered in detail later!), and just counts and prints all arguments supplied to the script:
#!/bin/bash

echo "Total number of arguments is: $#"
echo "The second argument is: ${2}"
echo "The very last argument is: ${!#}"

for Arg in "$@"; do
 echo "${Arg}"
done

return 0
If you execute this script for instance as:
source arguments.sh a bbb cccc
you will get as a printout:
Total number of arguments is: 3
The second argument is: bbb
The very last argument is: cccc
a
bbb
cccc
By using this functionality, you can instruct a script to behave differently if certain options or arguments are supplied to it. Since this is clearly a frequently used feature, the specialized built-in Bash command exists to ease the parsing and interpretation of positional parameters (see the documentation of advanced getopts (‘get options’) command, but do not confuse it with Linux utility with similar name getopt, which has flaws in its design).
3. Your first Linux/Bash command: Bash functions
As the very first and respectable version of your own command in Linux/Bash, which can take and interpret arguments, provide exit status, has its own environment, etc., we can consider Bash function.
Functions in Bash are very similar to scripts, however, the details of their implementations differ. In addition, functions are safer to use than scripts, since they have a well-defined notion of local environment. This basically means that if you have the variable with the same name in your current terminal session, as well as in the script or in the function you are executing, it’s much easier to prevent the clash of these variables if you use functions. In addition, usage of functions to great extent resembles the usage of Linux commands, and it is in this sense, that your first function developed in Bash can be also treated as your first Linux command!
An example implementation of Bash function could look like:
#!/bin/bash

function Hello
{
 # This function prints the welcome message
 # Usage: Hello <some-name>

 echo "Hello"
 local Name="${1}"
 echo "Your name is: ${Name}"

 return 0

}
Save the above code snippet in the file functions.sh. Then, in order to execute your function Hello, first you have to source that file:
source functions.sh
From this point onward, the definitions of all functions in the file functions.sh are loaded in the computer’s memory, and can be in the current terminal session used as any other Linux or Bash built-in command. To check this, try to execute:
Hello Alice
The output is:
Hello
Your name is: Alice
When compared to the script implementation, there are few differences:
-
Usage of keyword function (an alternative and more portable syntax exists,
someName(), but it is really a matter of taste which one you prefer) -
Body of the function must be embedded within
{ ... } -
For any variable needed only within the function, use the Bash built-in command local, to restrict its lifetime only within the body of that function. Every time local is executed, it creates a new local variable, which exists until the function exits. In this way, you will never encounter the clash between variables that were defined with the same name in the function, and in the terminal or within some other code from where you have called the function. If a variable is defined in the function without the local, a call to that function can severely spoil the environment from which the call to the function was executed, which can have dire consequences… As a rule of thumb, declare each variable you need only in the function as local .
-
Functions can be called recursively in a standard way
-
Similar to variables, functions can be made global by using export -f, for instance:
# define some shell function:
$ fun(){ echo abc; }

# make that function global:
$ export -f fun

# start a new shell instance in its own process:
$ bash

# call that function in a new process:
$ fun
abc
This feature is rarely used, however, because when a new shell instance is started, the configuration file
~/.bashrcis executed, and all function definitions can be automatically sourced from it (see below!).
The rest is the same as for the scripts:
- Functions handle arguments in exactly the same way as scripts, via special
${1},${2}, …, variables - You can call a function within another function, but only if it was defined first — order of implementation matters in scripting languages!
- Do not forget to provide the return value at the end of the function, which sets its exit status. For most of the time, functions are executed equivalently as commands, and then their exit status clearly matters. Functions cannot return values (e.g. string) directly to the caller, apart from the exit status set via return, which must be in the interval 0..255
- Typically, you implement all your functions in some file, let’s say
functions.sh, and save it in your home directory (or anywhere else). Then, at the end of${HOME}/.bash_profileand${HOME}/.bashrcyou insert the line:source ${HOME}/functions.shIf you have added the above line to
${HOME}/.bashrc, your functions defined in the filefunctions.shwill be automatically loaded in computer’s memory and are ready for usage in each terminal session, just as Linux commands — in this sense the first Bash function you have written can be regarded also as your first Linux command!
Finally, we remark that functions are superior to aliases: anything that can be done with an alias can be done better with a function. For instance, the classical alias definition:
alias ll='ls -alF'
can be reimplemented as a Bash function in the following way:
function ll
{
 ls -alF "$@";
}
Note that only the above implementation of function can easily be generalized — within the function body we can programmatically manipulate the arguments and, for instance, use different formatting options for the printout depending upon which directory we are in, etc.
4. Command precedence
We have seen that your very first input in the terminal, before the empty character is encountered, will be interpreted by Bash as the command name, where the command name can stand for an alias, built-in Bash command (e.g. echo), Linux command (e.g. date), Bash functions (e.g. Hello from the previous example), etc. But what happens if we have, for instance, alias and Linux command named in the same way, like in this example:
alias date='echo "Hi"'
If after this definition we type in the terminal date, we get:
$ date
Hi
What now? Have we just accidentally overwritten and lost permanently the command date? Not quite, what happened here is that the alias execution got precedence over the Linux command named in the same way. But both the alias date and the command date now exist simultaneously on your computer.
The command precedence rules in Bash are well defined and strictly enforced with the following ordering:
- aliases
- Bash keywords (if, for, etc.)
- Bash functions
- Bash built-in commands (cd, type, etc.)
- scripts with execute permission and Linux commands (at this level, the precedence is determined based on the ordering in PATH variable, as we already discussed)
Given the above ordering of command precedence, some care is definitely needed when introducing new aliases or developing new functions in Bash, to avoid the name clashes with the existing Linux commands.
Additional profiling of command precedence can be achieved in Bash with built-in commands builtin, command, and enable (check their ‘help’ pages in Bash). For instance, we can force that always the Bash built-in command echo is executed, even if the alias or function named echo exists, with the following syntax:
builtin echo someText
Reminder: If you have overwritten accidentally Linux command with some alias definition (like in the above example for date), use the command unalias to revert back permanently:
unalias someAliasName
or temporarily with
\someAliasName
In the case you are not sure to which one of the five cases above the command you intend to use corresponds to, use the Bash built-in command type:
$ type date
date is /bin/date
The above line tells that date is Linux command whose executable is /bin/date.
Two other examples in this context:
$ type echo
echo is a shell builtin
$ type ll
ll is aliased to `ls -alF'
For some commands, multiple independent implementations and executables can simultaneously exist on your computer, you can retrieve ‘em all with type -a, for instance:
$ type -a printf
printf is a shell builtin
printf is /usr/bin/printf
For the Bash functions, the command type also prints the source code of that function. For instance, for the function Hello discussed previously you would get:
$ type Hello
Hello is a function
Hello ()
{
    echo "Hello";
    local Name="${1}";
    echo "Your name is: ${Name}";
    return 0
}
This is quite handy, because if you have forgotten the details of the implementation of this particular function, you do not need to dig into the file functions.sh where a lot of your additional functions can be implemented in the meanwhile.
Note also that this way you can see immediately the implementation of some Bash functions which were not developed by you (therefore, you have no idea where in the file system is the file with their source code), but are nevertheless available in your terminal session:
$ type quote
quote is a function
quote ()
{
    local quoted=${1//\'/\'\\\'\'};
    printf "'%s'" "$quoted"
}
Finally, it can happen that accidentally you delete the file functions.sh. If this file was sourced before you deleted it accidentally, you can still retrieve the implementations of your functions from the computer’s memory with type, and then just redirect the output to some file.