PH8124
Lecture 2: Commands and variables
Last update: 20260428-1

Table of Contents
- Introduction
- Shell environment
- Editing a file in the terminal
- Your first Bash script
- Special configuration files in Bash
1. Introduction
When it comes to the operating systems nowadays, in high-energy experimental physics we mostly rely on Linux. That being said, as an experimental physicist you are sooner or later faced with the following situation: You have turned on your computer and launched the terminal…
… and what now??
You can start clicking with the mouse over the terminal, but quickly you will realize that this leads you nowhere. Next, you can start typing and pressing ‘Enter’, but especially if you do it for the first time most likely whatever you have typed in the terminal will produce only the error messages. Still, that is something, as it clearly means that there is some secret/magic command interpreter which is trying to respond to your command input, as soon as you have typed something in the terminal and pressed ‘Enter’.
What is that secret built-in command interpreter available in the terminal? This lecture is all about shedding light on its existence…
Loosely speaking, shell is the generic name of any program that user employs to type commands in the terminal (a.k.a. text window). Example shells:
- sh
- bash
- zsh
- ksh
- csh
- fish
- PowerShell (developed by Microsoft!)
To get the list of shells available on your computer, type in the terminal:
cat /etc/shells
The output of that command could look like:
/etc/shells: valid login shells
/bin/sh
/bin/dash
/bin/bash
/bin/rbash
/usr/bin/screen
/usr/bin/fish
How to select your favorite shell? It is simple, just type its name in the terminal and press ‘Enter’! E.g. if you want to use Bash as your working shell, just type in the terminal:
bash
and press ‘Enter’ — now you are in the Bash wonderland! Since that is by far the most popular shell nowadays, this lecture will focus exclusively on its concepts, syntax and commands. But no worries, at least conceptually, a lot of subjects covered in this lecture apply also to other shells! The difference between shells is mostly in the syntax, but in essence, they all aim to provide the same functionalities.
In this lecture we will cover only the Bash essentials, i.e. we will make you going, but how far you want to go eventually, it depends on your personal determination and time investment.
Important remark: Bash (or any other shell as a matter of fact) is first and foremost a command interpreter (i.e. interface for executing commands). Even though it offers a lot of functionalities typical for programming languages, its direct use as a programming language is only a distant second goal. In practice, within Bash code we can use directly and easily an executable of any full-fledged programming language (e.g. C, C++, Mathematica, etc.). But none of these languages can be used directly and easily as a command interpreter in the terminal.
Traditionally, the first program people write when learning a new programming language is the so-called “Hello World” example. Let’s keep up with this tradition and type in the terminal:
echo "Hello World"
This will output in the terminal:
Hello World
i.e. Bash has echoed back the text “Hello World” which was typed in the terminal as an argument to echo command. Let’s move on!
2. Shell environment: commands and variables
When you open a terminal, your local environment is defined via some command names and predefined variables, which can be used directly in the current terminal session. Before going more into the details of how to modify the shell environment, let us see first how commands and variables are used in general.
Commands
We have already seen how one built-in Bash command works, namely echo. In the same spirit, we can use in the terminal any other Linux command, not necessarily the built-in Bash command.
Example: What is the current time? Just type in the terminal date and press ‘Enter’
date
This will output in the terminal something like:
Mon Apr 20 14:49:10 CEST 2020
This is the default formatting of date command. Now use the command date with flag (or option) -u, in order to modify its default behavior:
date -u
This will output in the terminal the different text stream:
Mon Apr 20 12:49:12 UTC 2020
After passing a certain flag, we have instructed command date to change its default behavior. In the above example, the flag -u caused the command date to report time in Coordinated Universal Time format (UTC), instead of Central European Summer Time (CEST) time zone (which is the default for our location).
As another example, we have already seen how we can use cat command to view the content of file when inquiring which shells are available on the computer. We can pass to command cat as arguments more files to read in one go, i.e. we can execute the same command in one go on multiple arguments:
cat /etc/shells /etc/hostname
The output of that command now could look like:
/etc/shells: valid login shells
/bin/sh
/bin/dash
/bin/bash
/bin/rbash
/usr/bin/screen
/usr/bin/fish
transfer.ktas.ph.tum.de
Note the new entry in the last line, which is the content of file /etc/hostname .
We can, of course, combine options and arguments when invoking a command:
$ cat -n /etc/shells
     1	# /etc/shells: valid login shells
     2	/bin/sh
     3	/bin/dash
     4	/bin/bash
     5	/bin/rbash
     6	/usr/bin/screen
     7	/usr/bin/fish
The flag -n causes command cat to enumerate all lines in its printout.
In general, all Bash and Linux commands are conceptually implemented in the same way — let us now discuss what is conceptually always the same in their implementation and usage.
Generically, for most cases of interest, we are executing commands in the terminal in the following way:
<command-name> <option(s)> <argument(s)>
This is the right moment to stress the importance and profound meaning of empty character: Empty character is the default input field separator (IFS) in the world of Linux. If you misuse the empty character, a lot of input in the terminal will be completely incomprehensible to Bash, and to Linux commands in general. In the above generic example, empty character separates the three items, which conceptually have a completely different meaning. As the very first step, after you have typed the input in the terminal and pressed ‘Enter’, the Bash splits your input into tokens that are separated (by default, and in a bit simplified picture) with one or more empty characters. Then, it checks whether the very first token is a known Linux command, Bash built-in command, etc.
The command input in Bash is terminated either by a new line or by a semi-colon ; character. In practice, it is equivalent to write:
echo "Hello World"
date
or
echo "Hello World";date
or
echo "Hello World" ; date
For the purists, from a technical point of view, however, there is a slight conceptual difference between
firstCommand
secondCommand
and
firstCommand; secondCommand
In the first case, Bash first parses the syntax of firstCommand and executes it, only after that it will parse the syntax of secondCommand, and execute it. In the second case, Bash parses both the command inputs of firstCommand and secondCommand in a single pass, then executes firstCommand, followed by secondCommand.
Let us now scrutinize the above generic syntax for command execution term by term:
<command-name>: Whatever you type first in the terminal, i.e. before the next empty character is being encountered on terminal input, Bash is trying to interpret as some Linux command, Bash built-in command, Bash keyword, etc. In general, command-name stands for one of the following:- Linux command (i.e. system-wide executable or binary) — example: cat
- Bash built-in command — example: echo
- Bash keyword — example: for
- alias
- function
- script
<option(s)>: Options (or flags) are used to modify the default behaviour of command. Options are indicated either with:- - (single dash) followed by single character(s), or
- -- (two consecutive dashes) followed by more descriptive explanation about what needs to be modified in the default behaviour of command.
For instance, the frequently used flags -a and --all are synonyms, in a sense that they modify the default behavior of command in exactly the same way. The first version is easier to type, but the meaning of the second one is easier to memorize. Example for date command:
$ date -u
Mon Apr 20 12:49:12 UTC 2020
$ date --utc
Mon Apr 20 12:49:12 UTC 2020
The output in both cases above is the same, because flags -u and --utc are synonyms when used for date command.
But how do we know that for command date flags -u and --utc are available, and how do we know in which way they will modify the default behavior of command? All such options for each command are documented in so-called man pages. Whenever you develop a new command, it is also essential that you develop its documentation, otherwise nobody will be able to use your command. For built-in Bash commands, keywords, etc., the documentation is retrieved simply with:
help <command-name>
For Linux commands, we can use the command man (shortcut for manual) to retrieve the documentation. The syntax is fairly simple:
man <command-name>
The colorful online version of man pages is available at this link .
Example: To see which options are available for built-in Bash command echo, use:
help echo
The printout on the screen could look something like:
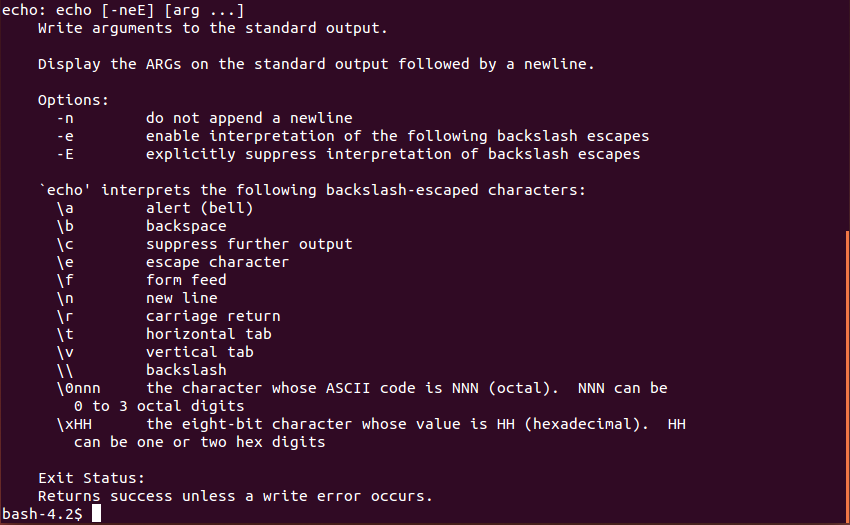
The command help gives a complete description of the built-in Bash commands (e.g. echo, jobs, read, etc.) or of Bash keywords (e.g. for, if, etc.).
Example: To see which options are available for Linux command date, use:
man date
The first page of a rather lengthy output could look like:
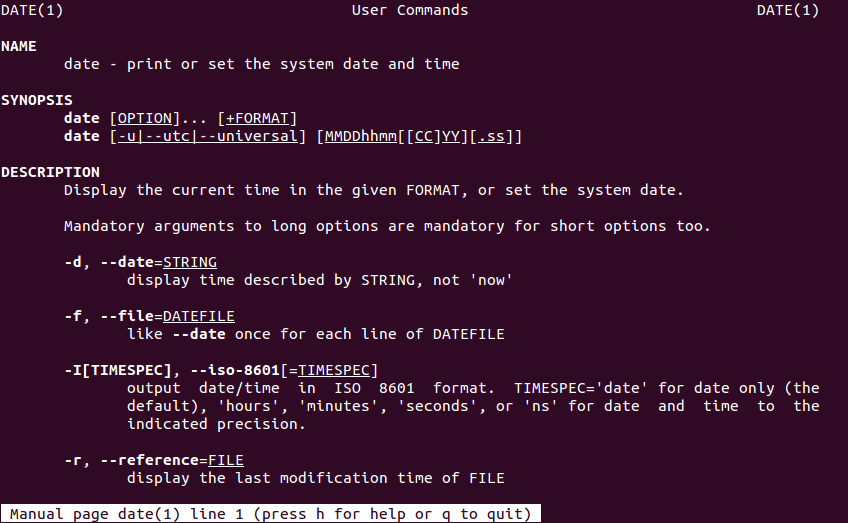
In order to exit the man pages, press ‘q’. You can scroll down the man page line-by-line by pressing ‘Enter’, or page-by-page by pressing ‘Spacebar’.
As you can see, even simple commands, like date, can have extensive documentation and a lot of options. It is clearly impossible to memorize all options for all commands, therefore usage of help and man commands is needed almost on a daily basis.
After we have covered command names and options, we close this section with the last item: command arguments.
<argument(s)>: This is simple, sometimes you want your command to be executed on the specified argument, or in one go on multiple arguments. For instance, we can make an empty file in the current working directory by using the touch command:
touch file_1.log
But we could create plenty of empty files with touch command in one go, not one-by-one, e.g.
touch file_1.log file_2.log file_3.log file_4.log
Important remark: Since the empty character is an input field separator, never use it as a part of a file or directory name! In such a context, always replace it with underscore _ or any other character which does not have special meaning. For instance:
touch file 1.log
would literally create two empty files, the first one named file, and the second one named 1.log . If you apply touch command on an already existing file, only the timestamp of that file will be updated to the current time, its content remains exactly the same.
In order to see or to list all files and subdirectories in the current working directory, use ls command, i.e.
ls -al
For the meaning of options -a and -l check the man pages of ls command. As a side remark, we indicate that options may or may not themselves require specific arguments. Options which do not require specific arguments, can be grouped together, i.e. ls -a -l is exactly the same as a shorthand ls -al.
In the same spirit, we can create multiple directories in one go, with mkdir command, e.g.
mkdir subdir_1 subdir_2 subdir_3
will make three new subdirectories in your current working directory (check again its content by executing ls -al).
We have been using so far only the already existing Bash or Linux commands. The simplest way to create your own command, with a rather limited functionality and flexibility but nevertheless quite convenient, is to use Bash built-in feature alias. If you are bored to type something lengthy again and again in the terminal, you can introduce shortcut for it, by using alias. For instance, you can abbreviate this lengthy input
echo "Hello, welcome to the lecture PH8124"
into the simple new command Welcome by creating an alias for it:
alias Welcome='echo "Hello, welcome to the lecture PH8124"'
Now the following new command in the terminal works as well:
Welcome
Press ‘Enter’ and the output in the terminal shall be:
Hello, welcome to the lecture PH8124
Quite frequently, aliases are used in the following context: If you want to connect from your desktop machine to some other computer, e.g. lxplus at CERN, you need to type in the terminal something lengthy like:
ssh -Y abilandz@lxplus.cern.ch
But do you really want to type that again and again each time you want to connect to lxplus at CERN? You can save a lot of typing, by introducing the alias for it:
alias lx='ssh -Y abilandz@lxplus.cern.ch'
Here basically you have defined the abbreviation (or alias, or shortcut) for lengthy command input, and you have named it lx. Now it suffices only to type in the terminal
lx
and you will be connecting to lxplus at CERN with much less effort and time investment.
Another typical use case of aliases is to prevent command name typos. For instance, if you realize that too frequently instead of ls you have a typo sl when writing in the terminal, which does nothing except producing an error message, you can simply define the new alias for it:
alias sl=ls
After this definition, sl is literally a synonym for ls command.
If you have forgotten all aliases you have introduced in the current terminal session, just type in the terminal
alias
and all alias definitions will show up. If you want to see what is the definition of the concrete alias you have introduced, use
alias <alias-name>
The alias definition can be removed with Bash built-in command unalias, e.g.:
unalias <alias-name>
If you want to clean up all aliases in the current terminal, use:
unalias -a
where also for the command unalias the option -a stands for ‘all’.
Aliases are definitely a nice feature, but do not overuse them, because:
-
By default, aliases are available only in the terminal in which you have defined them. But this can be easily circumvented by modifying the special configuration file
.bashrcand/or an additional customary file.bash_aliases— to be clarified later in this section; -
When you move to another computer your personal aliases are clearly not available there by default;
-
Aliases can overwrite the name of the existing Linux or Bash command, and aliases will have the higher precedence in execution. In this case, you can execute the overwritten command by prepending backslash
\to its name, i.e. with\commandName. For instance:$ alias ls="echo 44" $ ls 44 $ \ls ... standard list of files and directories ...In this context, we have escaped the alias definition of ‘ls’ with the special symbol backslash
\— this escaping mechanism is elaborated more in detail and in a wider context later; -
Aliases cannot process programmatically options or arguments, like regular commands (or Bash functions, as we will see later). In fact, any alias implementation can be reimplemented as a Bash function in a more general and flexible way. However, the function implementation requires more coding;
-
Do not use alias definitions in the shell scripts, that’s considered to be both bad coding and bad design practice.
In summary, aliases are literally shortcuts for lengthy commands or any other lengthy terminal input, and aliases are meant to be used directly in the terminal merely to save time on typing. Whatever you have defined an alias to stand for, Bash with simply inline or replace the alias name in the terminal with its definition, and then execute — nothing more nor less than that!
Variables
Just as any other programming language, Bash also supports a notion of variable. How to define variable in Bash? For instance, we want to use the variable named Var and initialize it with the value of 44. Simply type in the terminal:
Var=44
While this appears to be the most trivial thing you could do, even at this simple level we can encounter some problems, which can very nicely illustrate some of the general design philosophy used in Bash and Linux. Most importantly, since an empty character is the default input field separator, it would be completely wrong to type any of the following:
Var =44 # WRONG!!
Var= 44 # WRONG!!
Var = 44 # WRONG!!
In the 1st and 3rd cases above, we get the following error message Var: command not found, since Bash was trying to interpret the first token in the input, Var in this case, as a command name. Since command named Var was not found, Bash writes this error message in the terminal.
In the 2nd case, the error message is slightly different, namely 44: command not found, and it requires a separate explanation. In general, if we define a variable and execute some command in the same line like in the 2nd case above, i.e. without using ; to separate them, the content of that variable is visible only during the execution of that particular command. The generic syntax is:
Var=value command # content of 'Var' is seen only in 'command' during its execution
That means that the command input Var= 44 Bash will interpret as follows: Set the content of Var to nothing (this also removes the previous content if it existed), and use that new content only during the execution of command named 44. Since such command does not exist, we get the error message 44: command not found for this particular case.
Therefore, when introducing and initializing a new variable in Bash, make sure there are no empty characters on both sides of the assignment operator = .
As a side remark, from the above three lines, we can also see how to make a comment in Bash — simply use the special character # (hash symbol) to start your comment. Once this character is used on the particular line, any text after it is being ignored by Bash. You can not terminate the comment within a given line in which you have used # to start the comment. Therefore, you can terminate the commented text only by starting to write in the new line.
Example: Writing a comment in Bash.
$ echo "Hi there" # this text is some comment which Bash ignores
Hi there
Once defined, how to use (or reference) the content stored in a variable? In order to reference the content of a variable, we use the special symbol $ to achieve that, e.g.
Var=44
echo $Var
Also this syntax will do the job:
Var=44
echo ${Var}
In both cases the printout in the terminal is the same, namely:
44
So what is the difference between the two syntaxes above? The latter is less error-prone (as it clearly delineates with curly braces the variable name from the rest of the code!) and more powerful, as it enables a lot of built-in functionalities for string manipulations programmatically within Bash.
As an example, this will produce the desired result only in the latter case:
Var=44
echo test${Var}test
The output is:
test44test
If the first and shorter syntax is used instead, then Vartest would be interpreted as a variable name, and since such variable was not defined, it would evaluate to the null string.
Var=44
echo test$Vartest
The output is:
test
Few final additional remarks on variables in Bash:
- They are untyped (i.e. you do not need to specify at declaration whether variables are integers, strings, etc.). By default, all Bash variables are strings, but if they contain only digits and if you pass them to some operator which takes as argument(s) only integers, then Bash will interpret such variable as an integer;
- By convention, for the names of built-in Bash variables only capital characters are used (e.g. BASHPID, BASH_SOURCE, etc.), while for command names we use all low-case characters. For user’s variables, use some intermediate case, like
VarorsomeVariable, to ease the code readability and to avoid potential conflict with the existing built-in Bash variables. Variable name starts with a letter or underscore, and may contain any number of following letters, digits and underscores. Common mistakes: Variable name can not start with a digit and it can not contain a dash-; - The lifetime of a variable is by default limited to the terminal session in which you have defined it. But you can make its existence persistent in any new terminal you open (i.e. in your environment) by adding its definition to the very special
.bashrcconfiguration file (more on this at the end of this section!); - The scope of a variable is by default limited to the current process in which it was declared. But you can make its existence persistent in any new process started from the current process (i.e. in any child process), by using the shell’s built-in command export at its declaration, for instance,
export Var=44. This way, variableVaris persistent in all new processes started from your current terminal session, in which variable was both declared and exported. Using an alternative terminology, with export you have created a global variable; - To delete variable, use built-in command unset, e.g.
unset Var. Variables which do not exist are assumed to be null, i.e. equal to the empty strings. Therefore, even if variable namedVarwas not declared, this code snippet does not produce an error:echo $Var(simply, nothing is printed); - It is possible to store in the variable the output of some command, and then manipulate this output programmatically (more on this later!);
- It is possible to store in the variable the content of an external file (more on this later!);
- There are some built-in variables always set to some values, e.g. HOME, SHELL, PATH, etc. These special variables are the essential part of your shell environment, and if they are not set correctly, everything in your current terminal session can start falling apart (more on this later!).
Now that we have covered the very basics of commands and variables, let us see how we can develop the first Bash script. In order to achieve that, the very first step is to learn how to edit the file in the terminal.
3. Editing a file in the terminal
We have already seen how with touch command we can make an empty file. Now we will see how we can write a file or edit an already existing file in the terminal. The simplest way to write a new file, solely in the terminal (i.e. without using any graphics-based editor like gedit, emacs, vim, etc.), is to use command cat, in the following construct:
$ cat > someFile.txt
 This text is the content
  of my
first
   file.
CTRL+d
In the above construct, command cat takes the input directly from the standard input (keyboard by default), and redirects everything via operator > into the physical file named someFile.txt in your current working directory. You terminate the input, i.e. you mark the end of the file, by first moving to the new line with pressing ‘Enter’, and then finally by pressing CTRL+d on an empty line (if you press CTRL+d when the line is not empty, the input to the file is not terminated!). Now you can see the content of your newly created file with:
cat someFile.txt
Note that cat preserves all empty characters, line breaks, etc. In case you want to append something to the already existing file, we can use a slightly modified construct:
$ cat >> someFile.txt
test 1
test 2
CTRL+d
The operator >> appends the text at the end of an already existing file. If we would have used > to redirect the new content to the already existing file, that file would be overwritten with this new content — use > in such a context with great care! This, however, also implies that the above cat construct is rather limited, as it can be used either to write a new file from scratch or to append new content at the very end of an already existing file. But what if we want to edit the already existing content of the file?
For that sake, we need to use some simple editor which can be run in the terminal (i.e. without graphics). One such, wide-spread, open-source, editor is nano, which includes only the bare minimum of functionality needed to edit documents, making it very simple to use. In addition, the syntax coloring is available for most of the programming languages. As an exercise, let us edit the content of already existing non-empty file someFile.txt from the previous cat example.
nano someFile.txt
Now you are in the nano wonderland, not any longer in the Bash shell. This means that the commands you type now and all keyboard strokes are interpreted differently. After you have edited some existing text or wrote something new, simply in nano press CTRL+o (to write out into the physical file someFile.txt what you have edited so far in the editor — this is the same thing as saving, just jargon is different…). When you are done with editing, press CTRL+x to exit nano (and type ‘y’ followed by ‘Enter’ if you want to save the changes in the same file you have started with), and get back to the terminal. Of course, usage of nano is not mandatory to edit files, and for large files it is very inconvenient, but there are two nice things about nano which shouldn’t be underestimated — it is always available on basically all Linux distributions, and it can be run in the terminal (this becomes very relevant when connecting and working remotely on some computer, where access to graphics by default is not enabled, or when the network connection itself is too slow to sustain transmission of graphics). For editing of lengthy files, use some graphics-based editor: gedit is very easy to use without any prior experience, while emacs or vim are difficult for beginners, however, they offer much more features and are regularly used by professional programmers.
4. Your first Bash script
Now that we know a few basic commands and how to write and edit files, we can start writing our first Bash scripts. The script is a code snippet for interpreted or scripting language, that is typically executed line-by-line. At the very basic level, this saves the effort of retyping that particular sequence of commands each time it is needed. Typically, scripts are used to automate the execution of tasks that could alternatively be executed one-by-one by a human operator. A scripting language is a programming language that supports scripts, so clearly Bash fits in this category.
Let us now write the first Bash script! For instance, you can type in the terminal:
nano first.sh
Recall that now you are not any longer in the terminal, but in the very simple textual editor called nano. Whatever you are typing now, it will be saved in the file first.sh — the file which will hold your first Bash script (by convention Bash scripts always have an extension .sh). Your first Bash script could look as follows:
#!/bin/bash

echo "Welcome to PH8124 lecture"
# This is a comment...
echo "Today is:"
date

return 0
Now let us have a closer look at the content of your first Bash script:
- The first line is mandatory, namely:
#!/bin/bash - The first two characters in the first line are mandatory, namely:
#!(the combination of these two characters is called shebang or hashbang)
What is happening here is the following: #! in the first line indicates to the operating system that whatever follows next on the first line, must be interpreted as a path to the executable (e.g. /bin/bash if you want to run Bash), which then must be used to interpret the code in all the remaining lines in the script. In this way, you can put up together any script, not necessarily the one for Bash — you just need to change /bin/bash in the first line, and point out to some other executable.
From the above example, it can be seen that whatever we have previously executed directly in the terminal (e.g. echo or date commands), we can also write in the script, and then execute all commands in one go, by executing the script. That being said, at the very basic level, scripting saves you the time needed to retype again and again any regular sequence of commands, after you open a new terminal — for instance, the file first.sh you just made, is available in any new terminal you open!
How to execute the Bash script? It’s simple, just pass the file name as an argument to the command source (i.e. in jargon, you need to source your script):
source first.sh
And the output could look like:
Welcome to PH8124 lecture
Today is:
Mon Apr 20 16:07:18 CEST 2020
Equivalently, you can use the shortcut notation . (dot):
. first.sh
In this context, source and . are synonyms (compare the output of help source and help .).
Finally, return 0 sets the exit status of your script. In general, each command in Bash or Linux upon execution provides the so-called exit status. This is a fairly general concept, characteristic also for some other programming languages, and it enables us to programmatically check if the command has executed successfully or not. The exit status is classified as:
- 0 : success
- 1, 2, 3, … , 255 : various error states
The exit status is stored in the special variable $? . For instance:
date
echo $? # prints 0 , i.e. success
and
date -q # option -q is NOT supported in command 'date'
echo $? # prints 1 , i.e. one possible exit status for error
Typically in your code, after you have executed the command, you check its exit status. Then, depending on the value of this exit status, your subsequent code can branch in multiple directions. Remember that each Linux command has an exit status stored in the special variable $? upon its execution, so it shall also your Bash script. As long as you are executing your script via source command, you can set the exit status with the keyword return (as in the last line in your above script first.sh).
If you forgot to specify the exit status of your script with the keyword return, the special variable $? is nevertheless automatically set, but now to the exit status of lastly executed command in your script, which can lead to unexpected results.
5. Special configuration files in Bash
In this section, we discuss a few important configuration files which have a special meaning to Bash. The configuration files which a user can directly edit, acquire their special meaning only if they are placed in the user’s home directory, otherwise Bash will not find and execute them. To stress this out, we have prepended ~ (or equivalently $HOME) to the name of the user’s configuration files below. The special character ~ (tilde) is the shortcut for the absolute path to your home directory. As an example, execute:
echo ~
The output might look like:
/home/abilandz
This is the absolute path to your home directory in the Linux file system. The slash / delineates directories in the Linux directory structure (on Windows backslash \ is used instead in the same context). Each time you login, by default this is your starting working directory. This information is alternatively also stored in environment variable HOME, i.e.:
$ echo $HOME
/home/abilandz
By convention, the name of all configuration files in the home directory begins with . (dot), which means that ls will not list them by default.
User’s configuration files
These are the personal configuration files in the user’s home directory, which can be edited directly:
~/.bash_profile— this configuration file is only executed by Bash each time you log in to the computer, i.e. it is executed by the login shell. There are two synonyms for this file:~/.bash_loginand~/.profile, and they are executed at login only if~/.bash_profileis not present in your home directory. The files~/.bash_profileand~/.bash_logincan be read only by the login instance of Bash shell, while~/.profileis also read by some other shells, e.g. sh and ksh.-
~/.bashrc— this configuration file is read with the highest priority when you open a new terminal, or in general, whenever you start in its own process a new instance of Bash shell after you are already logged in. This file will also be read at login only if you add a linesource ~/.bashrcin~/.bash_profile. ~/.bash_logout— executed whenever the login shell exits (e.g. when you log out from the computer). This configuration file is rarely used, but by editing it, you can for instance automatically delete all temporary files at exit.
System-wide (default) configuration files
If by accident you have deleted your personal configuration files in your home directory, as a backup solution you can always rely on the two system-wide configuration files, which you cannot edit directly without having the administrator privileges:
-
/etc/profile— the default, system-wide, configuration file which is read at login. It is read before~/.bash_profile. This means that you will always have some default settings enabled after you log in on the computer, whether or not~/.bash_profilewith your personal settings exists or not. -
/etc/bash.bashrc— the default, system-wide, configuration file which is read each time you open a new terminal or start a new instance of Bash shell in its own process after you are already logged in. It is read before~/.bashrc. This means that you will always have some default settings enabled after you open a new terminal or start a subshell, whether or not~/.bashrcwith your personal settings exists or not.
We now elaborate on the usage of these configurations files by considering a few concrete examples.
Example 1: Changing a default shell on remote computer. You got access rights to some remote computer, and the admin responsible for it has set the old Bourne shell sh to be the default login shell. How to switch automatically at login to the Bash shell (or to any other shell you prefer)?
First, you have to figure out which configuration file is read by sh at login, and that turns out to be the special configuration file ~/.profile. If you add to that file a single line with the following content,
bash
each time you login on that remote computer, sh will execute the content of ~/.profile, i.e. it will start the Bash shell for you automatically, which in turn at its startup will read some of its own configuration files discussed above. The net effect is that you will transparently run and configure the Bash shell at login on a remote computer, even though it is not the default shell on that computer.
Example 2: Making definitions of variables and aliases permanent. We have already seen how to define your own aliases and variables and we already stressed out one important point: Their lifetime is limited to the duration of the terminal session in which you have defined them. In any new terminal you start, their definitions are not known. But there is one important thing which happens behind the scene each time you start a new terminal, and before you can start typing anything — Bash reads automatically the configuration files end executes line-by-line whatever is being set in them.
In the most cases of interest, it suffices to know that you need to edit directly your personal file, e.g. ~/.bash_aliases, and then in the Bash configuration files ~/.bash_profile and ~/.bashrc, both of which must be stored directly in your home directory, you insert the line (if this line is already not inside those files — by default it is already inside on most Linux distributions):
source ~/.bash_aliases
For instance, let us edit in your home directory the file named ~/.bash_aliases (any other name is perfectly fine as this is your personal file, not a special configuration file!). We start by executing in the terminal:
nano ~/.bash_aliases
And then in nano write the following two lines:
Var=44
alias sl=ls
Save the file and exit nano (press CTRL+x and choose ‘y’ followed by ‘Enter’). You can check the content of file ~/.bash_aliases via
cat ~/.bash_aliases
or, if the file got too lengthy and you need to scroll page-by-page, via
more ~/.bash_aliases
Since the content of ~/.bashrc file is read and executed each time you start a new terminal, and before you can start typing anything in the terminal, your own personal definitions (e.g. for aliases and variables) will be re-defined from scratch each time you start a new terminal, and you can re-use them again and again.
Each time you run a new terminal, the variable Var is set to 44, and you can use sl as the synonym for the ls command, i.e. you do not need to define them again in the new terminal sessions. In the case you need to add more aliases, simply edit again the file ~/.bash_aliases .
We remark that it is much safer to edit directly ~/.bash_aliases than to edit directly the file ~/.bashrc, where also some other and more important settings can be defined as well. In the case you move to another computer, you can enable your aliases there simply by porting the file ~/.bash_aliases , and adding on the new computer in ~/.bashrc and ~/.bash_profile the line source ~/.bash_aliases. On the other hand, typically it’s very difficult to port the entire ~/.bashrc from one computer to another, especially if they are running different Linux distributions.
Example 3: Automating some work at logout. We can also edit the ~/.bash_logout in the following example way:
# Set what will be executed when shell exits (e.g. when you close the terminal):
echo "Hasta la vista, that was all for today."; sleep 1s
Now each time you close the terminal in which you are running the instance of login shell (e.g. when logging out from remote computer), you will see the specified printout, and after the hardwired timeout of 1s, the terminal will close. In the very same spirit, you can specify any other action, which will be automatically executed by Bash when you close the terminal running the login shell.